Posted in 4th Term, Experimentation, Project Development

Unlocking Map Cut Scenes

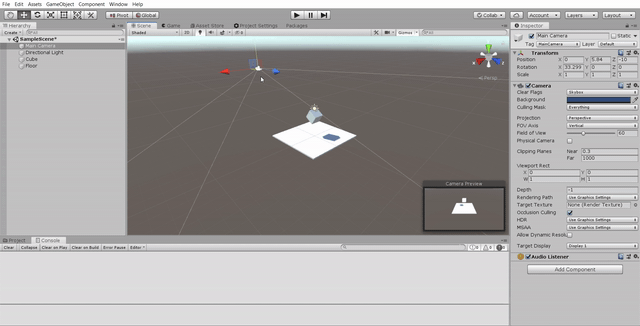
These Cut Scenes are planned to put in between the missions. When user successfully achieve the aim of a task, the next map will appear. Animation was created and put into the buildings.

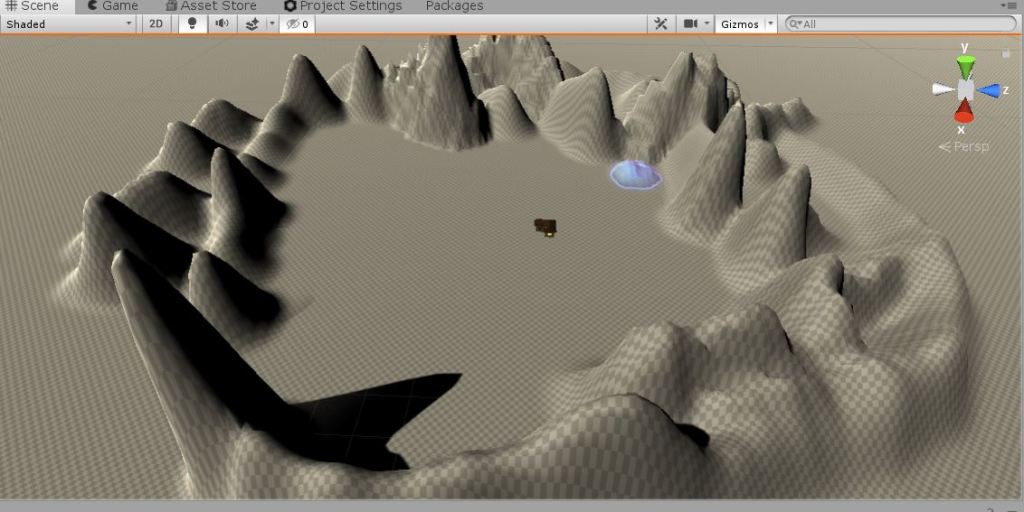
At the beginning, I thought of creating the whole terrain to rise up from the ground. However, I was told that terrain in Unity could not be animated. Instead of creating the whole terrain to appear, I change it to only the buildings will be rise.

In this animated gif, buildings will rise. Sound effect of landslide will be played in the background. Once animation ended, next mission scene will be triggered.

Posted in 3rd Term, Experimentation

Oculus Link to Unity

Before we plug in the Oculus Link to your desktop, we have to download the Oculus App into our desktop and phone.

Set up your Oculus Quest. Plug in your Oculus Link to your desktop! You will have to enable USB debugging inside your Oculus Quest.

Now, turn on your Oculus Quest and connect the wifi to the same IP as your phone and desktop.

On your handphone Oculus App, go to your Settings. Connect your Oculus Quest Device as well as your desktop one. Then, open the drop-down of the Device in your handphone Oculus settings. Turn on the developer mode.

After that, turn on your SteamVR. Then, put back your headset, enable Oculus Link.

Inside your headset, we will be load into your SteamVR room. Press the home button on your R Touch, select the virtual desktop.

Open your unity file in your desktop and press play. Your Quest will enter your game scene instead.

Posted in 3rd Term, Experimentation

Oculus Quest Setup

Go to Build Settings, switch the platform into Android. Change the Texture Compression into Adaptive Scalable Texture Compression (ASTC).

Go to Player Setting.

Go to the Other Settings, set up your Package Name, Version and Minimum API Level. API Level should not be less than 21.

Go to the XR Settings, check Virtual Reality Support and add in the Oculus VR SDK.

Go to the Packages, install the XR Management, Oculus Android, and Open VR.

Posted in 3rd Term, Experimentation, Project Development

Map Separation

There is this way that I can make the map appearance idea work. So, basically, I will have to create a new scene and add the terrain like the image below.

I didn’t want the game project to be too grand, so I actually modify the size of the terrain in the inspector. Do this before creating the curve and mountain.

The next thing is that I had redesigned the map/ world. I added in a new exploration journey for the player, which is a magical forest. When player walk into the forest, he/ she will press something to trigger an animation. The animation will be happens, the scenes will be that fireflies flying around the forest. Then after exiting the animation, the fireflies will stay there for around 60 seconds.

Posted in 3rd Term, Experimentation

VRoid Studio

Vroid Studio is a platform that allows people to make their own character avatar. First, install VRoid Studio into your desktop.

Lauch VRoidStudio and create a new Avatar.

You will land in the default avatar window. There are few tabs inside VRoid Studio which allow you to modify. There we can edit the face for examples we can enlarge the eye. We can change the iris colour or draw and design your iris design in the Texture panel. You can even help her make up, just go to the texture panel to edit the layer or you can design the face texture in Photoshop, export and import into VRoid Studio. In this experiment, I only enlarged the eye.

In the hair editor tab, click ass freehand group to design your character’s hair. I created bangs for her. We can modify the width of hair parameters, colour, and even hair cut. The Hair cut can be found under the Curve. Right now, I am drawing the hair according to the guide lines.

To add a pony tail for my model, go to the selection and modify the point/ vertex of the guide.

I clone the layer, and re position the guide for my ponytail to make it thicker.

Before going into the Clothing Editor, I enlarged the head of my model inside the Body Editor. Same as other Texture Panel, I redesign the T-shirt she’s wearing. To cut or add cloth to the costume design, select the Default image to draw or erase. Same, you can import your designed costume image into the layer. In my case, I am going to cut the shirt to make it cool. We can change the T-shirt colour or pants colour by changing the base colour.

Wala! So this is the final of my experiment.

Lastly, export the character. VRoid Studio export vrm file. So, your model will be exported into a vrm file.

Posted in 2nd Term, Experimentation

VR walking inside Unity without any external devices

I find to experience this is because that I did not have my headset yet, and is for my prototype.

First of all, go to github and download the GoogleVR (GVR) sdk for Unity.

Open your project file, import the downloaded package.

Next, go to Window, open package, make sure the Google VR Android is installed.

Go to build setting, switch platform to Android.

Next, go to player setting. Go to XR Settings, make sure the Virtual Reality Supported is check. Then, add in the cardboard sdk.

After that, you can go to the Content Panels, find GoogleVR > Prefabs drag (GvrEditorEmulator, GvrEventSystem, GvrControllerMain) into the hierarchy panel. Next create a new GameObject, name it Player.

Alright, now dray main camera into to Player.

Next, find GoogleVR > Prefabs (GvrReticlePointer) and drag it into the Player as well.

Now, select the Main Camera, add component. Search for GvrPointerPhysicsRaycaster, double click to select it.

Besides, search for Character Controller for the Player.

After all, add a new script. We call it VRLookWalk

Type in this script.

Thus, save and drag Main Camera from panel to this Vr Camera.

Lastly play the game. Press Alt to walk.

Posted in 2nd Term, Experimentation

Terrain in Unity

Hello guys, today I experience with how to create a Terrain world for my project.

Terrain world is usually used for creating rpg or mmorpg games.

First, go to GameObject, create a new GameObject (Terrain).

Select the brush (Raise or Lower Terrain). Brush it on the terrain. You can change the brush size if you need.

To paint the area in colour, change the brush into Paint Texture.

Click Edit Terrain Layers, and select the texture you want. The texture supports jpg but not material. So, you may search on google on what kind of texture you want, download and upload into the asset folder.

After that, you can see a terrain layer appear. Select the texture and start painting your terrain.

I had also placed another layer under the grass texture.

In the end, you can see the terrain mountain is created with grass and rocks texture on them.

Posted in 2nd Term, Experimentation

‘Is Working’ Collider Unity

Today, I experiment with creating collider between object and object.

First of all, open a new 3D project file as usual. Create new GameObjects, a cube and a plane.

Next, position both game objects. Cube on top of the plane and make sure resize the object like the image above. Then, select the cube, add a Rigidbody to it under inspector. Use gravity.

Under the box collider, please check ‘Is Trigger’.

As well as the plane, check ‘Is Trigger’.

Now, create a new C# script. I renamed it as TestColliderScript.

Add in script.

Play and test the game.

Posted in 2nd Term, Experimentation

Object Behaviour in Unity

Today, I learnt game object behaviour scripting in Unity3D.

As usual, open a new 3D project file in Unity hub.

Next, create a empty game object. In this, I just simply create a cube.

Create a new game object ‘plane’ too. Scale the plane like the screenshot below. Rename it as Floor. Then, position the cube above the plane with a certain distance between them.

After that, create a new folder. Rename the folder as C# Script.

Double-click into the folder. Create a new C# Script. Rename the C# Script as TouchColour.

Alright, now double-click the script and began typing in the script. Slightly explain you the language below. TouchColour is a variable. Looking down, we can see the input. If we press the key ‘R’ down (keyboard), the component ‘game object’ will turns it’s colour into red. Follow by the others.

After typing the script. Save the file. Now, let us go back to our unity project. Select the cube, you may see a Add Component at the bottom of the inspector. You can type in Script, add a new script, select TouchColour, or you can straight away drag your script into the cube inspector.

Next, I would like my cube to have gravity while I play my game. Go on to the Rigidbody under inspector, check the Use Gravity.

Last but not least, test the game. You will achieve something like this.