Posted in 3rd Term, Experimentation

Oculus Link to Unity

Before we plug in the Oculus Link to your desktop, we have to download the Oculus App into our desktop and phone.

Set up your Oculus Quest. Plug in your Oculus Link to your desktop! You will have to enable USB debugging inside your Oculus Quest.

Now, turn on your Oculus Quest and connect the wifi to the same IP as your phone and desktop.

On your handphone Oculus App, go to your Settings. Connect your Oculus Quest Device as well as your desktop one. Then, open the drop-down of the Device in your handphone Oculus settings. Turn on the developer mode.

After that, turn on your SteamVR. Then, put back your headset, enable Oculus Link.

Inside your headset, we will be load into your SteamVR room. Press the home button on your R Touch, select the virtual desktop.

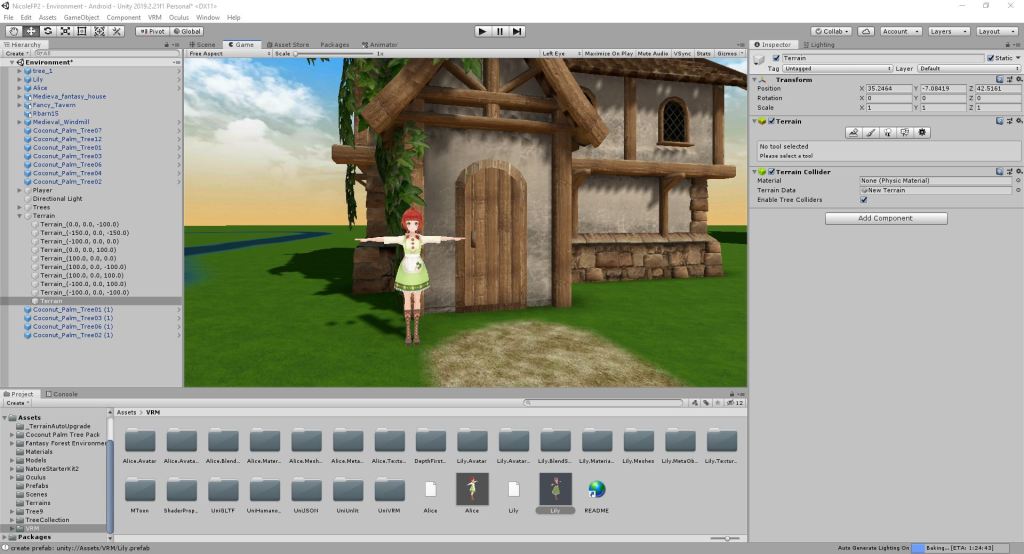
Open your unity file in your desktop and press play. Your Quest will enter your game scene instead.

Posted in 3rd Term, Experimentation

Oculus Quest Setup

Go to Build Settings, switch the platform into Android. Change the Texture Compression into Adaptive Scalable Texture Compression (ASTC).

Go to Player Setting.

Go to the Other Settings, set up your Package Name, Version and Minimum API Level. API Level should not be less than 21.

Go to the XR Settings, check Virtual Reality Support and add in the Oculus VR SDK.

Go to the Packages, install the XR Management, Oculus Android, and Open VR.

Posted in 3rd Term, Project Development

NPC: Lilia

Lilia is one of my main NPC that is really important in my game. To start off creating Lilia, I had search for few reference online. This is the part where I was creating the hair.

Final Hair.

This is the part where I am recreating the costume.

Yes, I added some lace.

This is the final model of Lilia.

Posted in 3rd Term, Project Development

Building The Forest

Create a new project file, and create new scene. I created few terrains following the map I designed. I imported my models and start decorating the environment.

A pause on the forest building progress. Remember to download an important asset from the unity Asset Store too: the Oculus Integration.

This is the forest.

There the sample terrain that I used to test the height of the trees. I started building the nature environment first is because this can help me to constraint the space I will need to place my buildings. So that the world doesn’t seem too small and also not to be seen as too much space.

Posted in 3rd Term, Experimentation, Project Development

Map Separation

There is this way that I can make the map appearance idea work. So, basically, I will have to create a new scene and add the terrain like the image below.

I didn’t want the game project to be too grand, so I actually modify the size of the terrain in the inspector. Do this before creating the curve and mountain.

The next thing is that I had redesigned the map/ world. I added in a new exploration journey for the player, which is a magical forest. When player walk into the forest, he/ she will press something to trigger an animation. The animation will be happens, the scenes will be that fireflies flying around the forest. Then after exiting the animation, the fireflies will stay there for around 60 seconds.

Posted in 3rd Term, Project Development, Survey & Interview

Progress Feedback

Instead of having just a terrain, my lecturer had inspired me with allowing my player to explore the world on unlocking maps. As the image below shows only one whole thing. Can see everything easily.

Therefore, I will have to find a way to do terrain cut or another possible way to separate the terrain into pieces. So once the player achieves a specific goal, it will trigger the map to appear. Then the player can continue his/her journey of exploring the game.

Posted in 3rd Term, Experimentation

VRoid Studio

Vroid Studio is a platform that allows people to make their own character avatar. First, install VRoid Studio into your desktop.

Lauch VRoidStudio and create a new Avatar.

You will land in the default avatar window. There are few tabs inside VRoid Studio which allow you to modify. There we can edit the face for examples we can enlarge the eye. We can change the iris colour or draw and design your iris design in the Texture panel. You can even help her make up, just go to the texture panel to edit the layer or you can design the face texture in Photoshop, export and import into VRoid Studio. In this experiment, I only enlarged the eye.

In the hair editor tab, click ass freehand group to design your character’s hair. I created bangs for her. We can modify the width of hair parameters, colour, and even hair cut. The Hair cut can be found under the Curve. Right now, I am drawing the hair according to the guide lines.

To add a pony tail for my model, go to the selection and modify the point/ vertex of the guide.

I clone the layer, and re position the guide for my ponytail to make it thicker.

Before going into the Clothing Editor, I enlarged the head of my model inside the Body Editor. Same as other Texture Panel, I redesign the T-shirt she’s wearing. To cut or add cloth to the costume design, select the Default image to draw or erase. Same, you can import your designed costume image into the layer. In my case, I am going to cut the shirt to make it cool. We can change the T-shirt colour or pants colour by changing the base colour.

Wala! So this is the final of my experiment.

Lastly, export the character. VRoid Studio export vrm file. So, your model will be exported into a vrm file.